
News
Secret Santa Sleuth: Festive Fingerprints
As a team of forensic scientists and researchers’ we’ve got a new twist on Secret Santa that involves a little detective work involving festive fingerprints!
Published on 2 December 2019
This Christmas we know lots of people will be taking part in Secret Santa. The most fun part (other than the gift) is working out who your gift is from. As a team of forensic scientists and researchers’ we’ve got a new twist on Secret Santa that involves a little detective work involving festive fingerprints!
Rather than signing your gift mark it with a fingerprint and you can get creative with your gift-tag designs! It’s pretty straightforward to capture a good fingerprint to use on a gift tag using a stamp pad. The trick is not to put too much ink on your finger but enough so you can see the detail of the patterns within the print. Everyone taking part in secret Santa should also provide a second fingerprint by using the stamp pad and putting their print on a piece of paper, along with their name so you can create a SANTA WALL. This gives you a ‘reference collection’ which will let you identify who your secret Santa present is from. Just match the fingerprint on the present to the fingerprint on the Santa wall – and you will identify the person who has given you your present (make sure you use the same finger for the Santa wall as you did on the present though)!
TIP: A hand-held lens might be useful to help you see some of the features more clearly.
Here are some tips to help you with your investigation
Fingerprints have some distinctive patterns
- Loops (in different directions)
- Whorls
- Arches
- and combinations of the patterns.
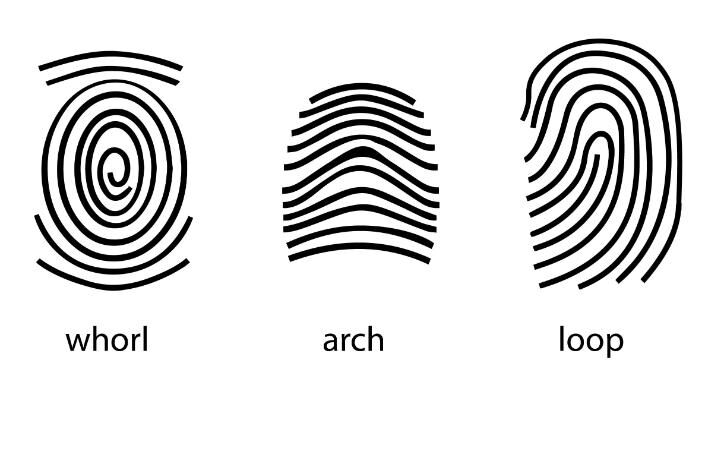
These are your level 1 features and can be useful to categorise prints. What you can see are friction ridges that are on the raised part of the outer layer of skin – the epidermis. They develop in the womb, stay consistent over time and differ between individuals.
Once you have narrowed your search using the level 1 features, you can take a look at some secondary level detail. This looks at major characteristics called minutiae. There might be many, many of these!
If you still have not identified who your secret Santa is from, or even if you have, you can then look at the third level detail. Third level detail is the specific ridges and positioning of sweat pores, scars and other features – it’s not always possible to look at this level of detail due to the standard of the print
Let us know how you get on! There are some further tips below on how to carry out your investigation. Veronika Dzetkulicova is a PhD student at LRCFS who is looking at the possibility of human identification via dermal fingerprints – this is in cases where the top layer (the epidermis) is no longer available for fingerprinting. You can hear more about her research here at her winning 3 Minute Thesis presentation at the University of Dundee!
Further tips and information
Fingerprint examiners follow a well-defined methodology which involves four processes which, combined together, are known as ACE-V.
- Analysis –The three levels of detail are determined. The fingermark is first examined and the various features at each level of detail are marked and recorded–this is called charting. Next the fingerprint(s) of different individuals suspected as being the source of the fingermark are examined and the various features at each level marked and recorded.
- Comparison –A direct comparison of two friction ridge impressions are made and similarities and differences are determined. The most likely ‘candidate fingerprint(s)’which look most like the recovered fingermark are chosen. The fingermark and fingerprint are then placed beside each other and a direct comparison made looking for differences and similarities.
- Evaluation –Conclusions relating to the presence or absence of friction ridge detail is made to decide whether two friction ridge impressions (the fingerprint and the fingermark) could have been made by the same person, or by different people or whether there is insufficient detail to make a conclusion.
- Verification –This is where a second fingerprint examiner re-examines the impressions and reaches a conclusion independently.
Here's an example of a fingerprint that has been marked-up. Marking-up the features on a print can make any comparison easier.

History of fingerprint use
The use of prints dates back to as early as 220 BC where records from China show details of handprints as evidence used in burglary investigations. Fingerprints were used in replacement of signatures on contracts by the English in India. Sir William James Herschel (1833-1917) adopted the practice and he noticed that fingerprints differed between people and do not go through substantial changes over a lifetime. The Scottish Physician Henry Faulds published in Nature in 1880 that fingerprints could be used for identification purposes.